Difference between revisions of "Solve"
(→Retrieve/build a version of PHASTA code) |
(→Build the executable/specify runtime parameters) |
||
| Line 21: | Line 21: | ||
If the user needs additional libraries they can often be found with the following command: | If the user needs additional libraries they can often be found with the following command: | ||
softenv | softenv | ||
| + | lets build this code! Navigate into this build subdirectory and create a file named "unpack_buildFiles.sh" with the following content: | ||
| + | #!/bin/bash | ||
| + | |||
| + | cmake \ | ||
| + | -DCMAKE_C_COMPILER=gcc \ | ||
| + | -DCMAKE_CXX_COMPILER=g++ \ | ||
| + | -DCMAKE_Fortran_COMPILER=gfortran \ | ||
| + | -DCMAKE_BUILD_TYPE=Debug \ | ||
| + | -DPHASTA_INCOMPRESSIBLE=ON \ | ||
| + | -DPHASTA_COMPRESSIBLE=OFF \ | ||
| + | -DPHASTA_USE_LESLIB=ON \ | ||
| + | -DLESLIB=/users/matthb2/libles1.5/libles-debianjessie-gcc-ompi.a \ | ||
| + | -DCASES=/home/mrasquin/develop-phasta/phastaChefTests \ | ||
| + | -DPHASTA_TESTING=OFF \ | ||
| + | ../phasta-next-master/ | ||
| + | This should create the makefiles required for the build. Perform the following command: | ||
| + | make -j | ||
| + | |||
| + | |||
| Line 26: | Line 45: | ||
If there is a specific branch off of phasta-next that you'd like to build, navigate to phasta-next and use the following command: | If there is a specific branch off of phasta-next that you'd like to build, navigate to phasta-next and use the following command: | ||
git checkout "branchname". | git checkout "branchname". | ||
| − | If this is a branch that I will be working on for a while, I tend to alter the build and code directories according to the branch-name. | + | If this is a branch that I will be working on for a while, I tend to alter the build and code directories according to the branch-name. Note that the respective pointer in the "unpack_buildFiles.sh" file (ie the last line) will have to be set accordingly. |
=== Running the Solver === | === Running the Solver === | ||
Revision as of 21:40, 14 September 2020
Contents
Exporting to PHASTA
After the partitioning performed via Chef in the last steps, we have the problem domain in a form that the PHASTA executable can read. Make a directory named "Run". This will contain all of the simulation data from this case. Remember that for this onRamp tutorial we have partitioned our case of interest to 8 parts. Therefore we will also create a subdirectory named "8-procs-case". In this subdirectory make softlinks to the N=8 restart and geombc and restart "checkpoint" files that where constructed. When in this subdirectory a good command to do this is the following :
ln -s ../../Chef/8-1-Chef/8-procs-case/restart* .
ln -s ../../Chef/8-1-Chef/8-procs_case/geombc* .
Also create a numstart.dat file. This file will specify the time and timestep that the simulation has completed to. Use the following command in the "Run/8-procs_case" directory :
echo 0 0>numstart.dat
Build the executable/specify runtime parameters
What remains is to determine the version of PHASTA to build and run. Since there are a bunch of researchers working on PHASTA at any given time, there are many branches/versions of the main code. If you are a part of the research cohort you may be directed to phasta-next, but many of the same steps may be taken from the public version.
Retrieve/build a version of PHASTA code
Navigate to your home directory. Create a directory here named "git-phasta". In a web browser, navigate to the online git repository for phasta-next and select the "clone" or "code" icon. The result should be the simular to the following picture, where a pop-up gives a web address:
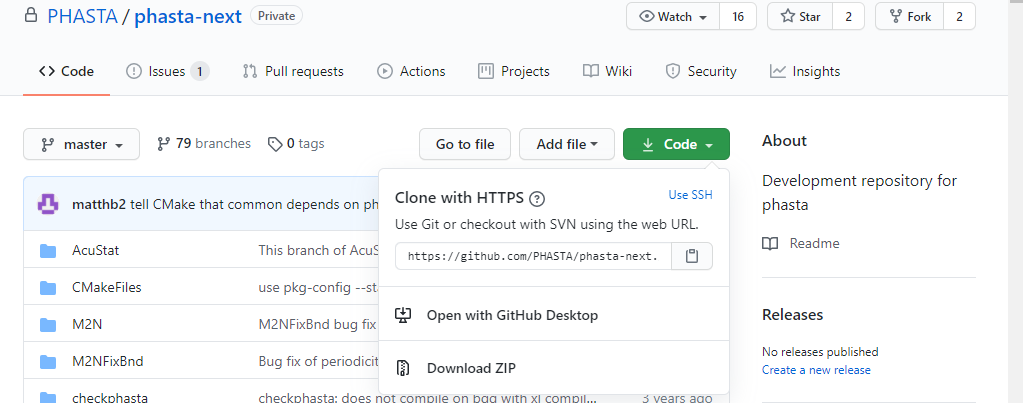

Copy this address and within the "git-phasta" directory execute the following command and enter your github credentials:
git clone https://github.com/PHASTA/phasta-next.git
After this is finished their will be a subdirectory created named phasta-next that contains the code tree that you wish to build. Back within the git-phasta directory create another subdirectory named: "build_phasta-next". Now we must set the environment so that the compiler has the necessary libraries. If you perform the following command, the listed environment libraries that ken often uses are listed, and are often sufficient:
more ~kjansen/soft-core.sh
At the time that this page is created, the relevant commands to load the needed environment are the following:
soft add +gcc-6.3.0
soft add +openmpi-gnu-1.10.6-gnu49-thread
soft add +simmodeler-6.0-171202
If the user needs additional libraries they can often be found with the following command:
softenv
lets build this code! Navigate into this build subdirectory and create a file named "unpack_buildFiles.sh" with the following content:
#!/bin/bash
cmake \
-DCMAKE_C_COMPILER=gcc \
-DCMAKE_CXX_COMPILER=g++ \
-DCMAKE_Fortran_COMPILER=gfortran \
-DCMAKE_BUILD_TYPE=Debug \
-DPHASTA_INCOMPRESSIBLE=ON \
-DPHASTA_COMPRESSIBLE=OFF \
-DPHASTA_USE_LESLIB=ON \
-DLESLIB=/users/matthb2/libles1.5/libles-debianjessie-gcc-ompi.a \
-DCASES=/home/mrasquin/develop-phasta/phastaChefTests \
-DPHASTA_TESTING=OFF \
../phasta-next-master/
This should create the makefiles required for the build. Perform the following command:
make -j
Additional notes
If there is a specific branch off of phasta-next that you'd like to build, navigate to phasta-next and use the following command:
git checkout "branchname".
If this is a branch that I will be working on for a while, I tend to alter the build and code directories according to the branch-name. Note that the respective pointer in the "unpack_buildFiles.sh" file (ie the last line) will have to be set accordingly.